Dynu IP Update Client is a powerful client software which detects any changes to your system's IP address and reports it to Dynu name
servers so that your domain name points to the IP detected by the client. It works for both top level domain names (yourdomain.com) as
well as third level domain names (yourdomain.dynu.com). You may download and follow the instructions below to setup the client.
This guide is for Dynu IP Update Client version 5.5. If you have an older version of the client, we suggest that you download and use the latest version 5.5. You may check out a list of the powerful features of the client here.
Username
Your Dynu account username. You may find it in the My Account and then
Contact Details section in the control panel.
It can be changed in the Change Username/Password area.
Password You may use your account password or take advantage of setting up a separate IP update password different from the account password. If you sign up for membership, you can set up different passwords for different groups for other users to use.
Group (Optional) Use 'Group' parameter if you want to update IP address for one or a collection of hostnames including subdomains that are grouped together and share the same IP. You may set up group for your hostnames in the Groups section of the control panel. Make sure that you leave the 'Group' field empty if you did not assign your hostnames to a group in the control panel. Leaving 'Group' field empty will update all the hostnames in the user account that have not been assigned a 'Group'.

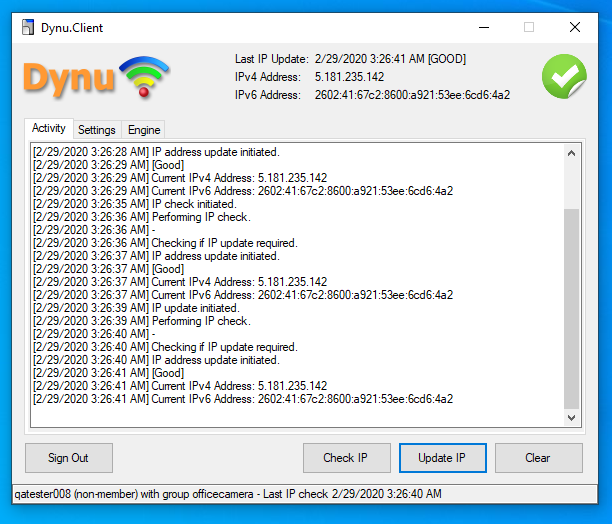
The 'Activity' tab displays information regarding IP address update progressively. By default, it detects IP every 120 seconds.
You can also initiate an IP update by clicking the 'Update IP' button.

Connection Type

Poll Interval Using this you can allow your client to detect your IP in the chosen time interval. By default, the client detects IP every 120 seconds.
Update Port You can choose which port to perform IP updates. Use a port other than port 80 to avoid ISP proxy.
Update IPv4 address Enable this if your network has an IPv4 address and you want the hostname mapped to the current IPv4 address.
Update IPv6 address Enable this if your network has an IPv6 address and you want the hostname mapped to the latest IPv6 address. Keep this option disabled if your ISP does not provide you with IPv6 connectivity.
Logging Logging allows you to keep track of the client activity and debug any configuration or connection issues you may have.
Log Level The default 'Detailed' log level allows you to monitor your IP changes. You can check the logs by clicking the 'Log Files' button in the 'Engine' tab.
Launch engine (Windows service) at startup Checking this field allows the Windows service to start up when the system boots up. IP updates will be performed in the background.
NOTE : Please click 'Save' button to save any changes.
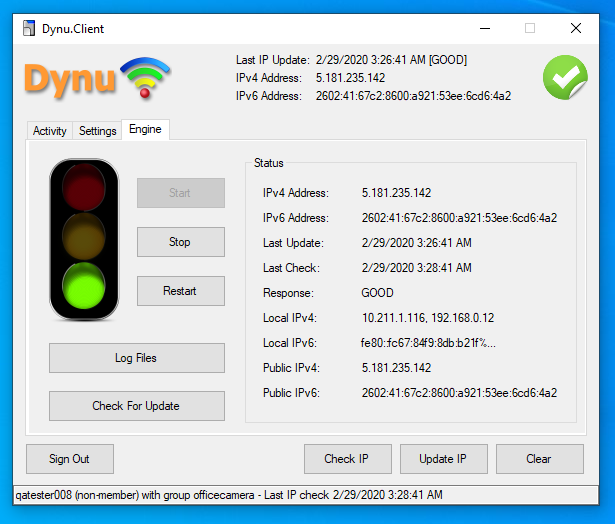
Engine must be started for the client to perform IP checks and IP updates.
Starting the engine will start a Windows service that runs quietly in the background to do IP updates.
If the engine is turned on, the IP updates will be running even if you exit the client.

Start This button will start the engine.
Stop This button will stop the engine. No IP checks and updates will be performed if the engine is stopped.
Restart Clicking this button will restart the engine.
Log Files Clicking this button will open the directory where the log files are kept.
Check For Updates You can install the latest version of the client by clicking this button.
This guide is for Dynu IP Update Client version 5.5. If you have an older version of the client, we suggest that you download and use the latest version 5.5. You may check out a list of the powerful features of the client here.
 Login
Login
Username
Your Dynu account username. You may find it in the My Account and then
Contact Details section in the control panel.
It can be changed in the Change Username/Password area.
Password You may use your account password or take advantage of setting up a separate IP update password different from the account password. If you sign up for membership, you can set up different passwords for different groups for other users to use.
Group (Optional) Use 'Group' parameter if you want to update IP address for one or a collection of hostnames including subdomains that are grouped together and share the same IP. You may set up group for your hostnames in the Groups section of the control panel. Make sure that you leave the 'Group' field empty if you did not assign your hostnames to a group in the control panel. Leaving 'Group' field empty will update all the hostnames in the user account that have not been assigned a 'Group'.

 Activity
The 'Activity' tab displays information regarding IP address update progressively. By default, it detects IP every 120 seconds.
You can also initiate an IP update by clicking the 'Update IP' button.

 Settings
Connection Type
- Detect IP Address on Client Side (LAN Internal IP Address) - Your computer's IP address will be detected on your local computer.
- Detect IP Address from Server Side (Router External IP Address) - With this option, your computer IP or the IP Address of NAT firewall or Proxy is detected. It will detect the IP which your ISP has provided to you.
- Detect IP Address from both Client and Server Side - This method is quite useful in situations where your computer does not access the Internet through a firewall and your computer has multiple IP addresses.
- Use this IP Address - This option is useful when you want to run the client on one computer but want your domain to point to IP address of another computer.
- Detect IP Based on MAC address - This option allows you to detect the IP based on MAC Address.

Poll Interval Using this you can allow your client to detect your IP in the chosen time interval. By default, the client detects IP every 120 seconds.
Update Port You can choose which port to perform IP updates. Use a port other than port 80 to avoid ISP proxy.
Update IPv4 address Enable this if your network has an IPv4 address and you want the hostname mapped to the current IPv4 address.
Update IPv6 address Enable this if your network has an IPv6 address and you want the hostname mapped to the latest IPv6 address. Keep this option disabled if your ISP does not provide you with IPv6 connectivity.
Logging Logging allows you to keep track of the client activity and debug any configuration or connection issues you may have.
Log Level The default 'Detailed' log level allows you to monitor your IP changes. You can check the logs by clicking the 'Log Files' button in the 'Engine' tab.
Launch engine (Windows service) at startup Checking this field allows the Windows service to start up when the system boots up. IP updates will be performed in the background.
NOTE : Please click 'Save' button to save any changes.
 Engine
Engine must be started for the client to perform IP checks and IP updates.
Starting the engine will start a Windows service that runs quietly in the background to do IP updates.
If the engine is turned on, the IP updates will be running even if you exit the client.

Start This button will start the engine.
Stop This button will stop the engine. No IP checks and updates will be performed if the engine is stopped.
Restart Clicking this button will restart the engine.
Log Files Clicking this button will open the directory where the log files are kept.
Check For Updates You can install the latest version of the client by clicking this button.
Custom
A1 Hybrid Box
Apple Airport
Arris
Bintec
BT Smart Hub
Cisco Router
Cudy AC1200
DD-WRT
D-Link DSR-250N
Dovado
DrayTek
E-Lins
Express VPN
HUAWEI HG 533/520v
HG8245/8045/8346M
FreeNAS
Fritzbox
IC Realtime
Maxis AC1200
Mikrotik
MultiTech
MOFI4500
Ooredoo
Open Wrt
OPNsense
pfSense
pfSense (IPv6)
QNAP
Raspberry Pi
Sagemcom
Synology NAS
Technicolor TG582n
Technicolor TG588
Technicolor TG789
TELTONIKA
Thomson TG585v7
Tomato USB
Tilgin
TP-Link ER605
TrueNAS
Ubiquiti EdgeRouter
WatchGuard Firebox
Windtre
ZTE
ZyWALL-USG50
Zyxel 5501
Zyxel-C1100Z
Zyxel VMG3925
Zyxel VMG3927-T50K
