
Step 1: Install Minecraft Server
First you need to download Minecraft server from Minecraft download page. For Windows, you have .exe file or .jar file available for download and there is no real difference between these two, both requiring the latest version of JAVA installed.
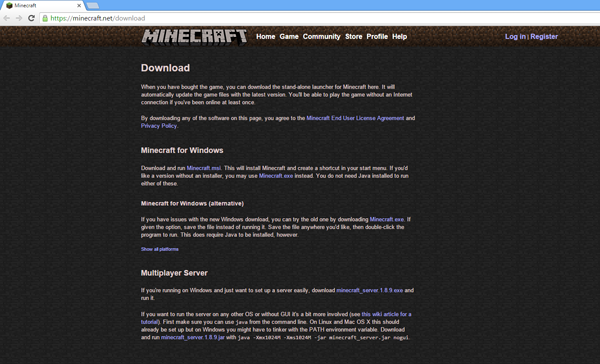
After double clicking on the file to start the server, the server will write some configuration files in the folder and quits right away. One thing you need to do is to accept EULA (End User License Agreement). Locate the eula.txt file created in the application folder and change the line
eula=false to eula=true.
This basically means that you accept the EULA.
For more details on installing and configuring Minecraft server, you may refer
to Minecraft tutorials.
Step 2: Set up Port Forwarding in the router (Skip this step if you can add SRV record for your hostname in step 4)
Please log into the router website (generally at http://192.168.1.1 or http://192.168.0.1) and go into the 'Port Forwarding' section. Add a new 'Port Forwarding' rule for TCP port 25565 to be forwarded to the internal IP of your computer. To get the internal IP address of the device, you may type ipconfig in "cmd.exe". It is usually in the form of "192.168.1.*".
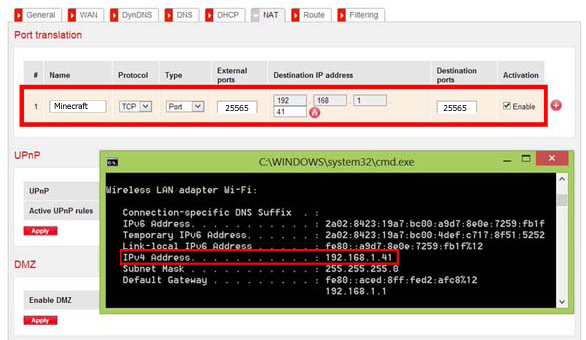
For more detailed instruction to set up port forwarding, you may refer to this page. To see if the port forwarding has been setup correctly, you can use our Port Check network tool to see if the corresponding port is open. If you get a "Success" response from the port check, then your network has been correctly set up.
STEP 3: Map your dynamic IP to a hostname
Internet service providers change your IP address on a regular basis, but with dynamic DNS you can keep your domain pointing at the current IP of your home server.
You may register a domain name of your own (yourdomain.com) and sign up for Dynu Dynamic DNS Service for it or use a free Dynu domain name (yourdomain.dynu.com).
STEP 4: Set up SRV records (Use this step if you do not want to set up port forwarding)
If you don't want to expose the port on which you host your Minecraft server or want to connect to it using simply the hostname instead of hostname: port. You may do so by adding an SRV record.
Go to
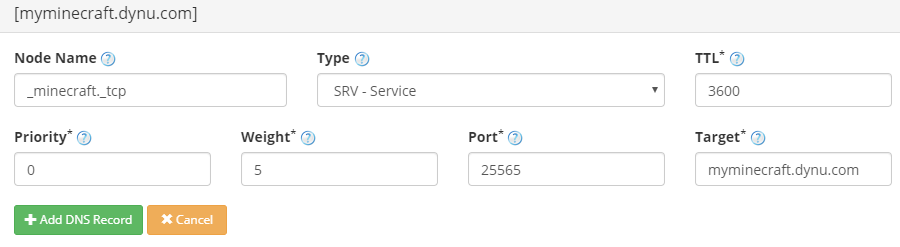
Node Name
_service._protocol.sub.
For example, _minecraft._tcp.sub. The service name is minecraft, the protocol is tcp and the record is for sub.minecraft.dynu.com.
Use _service._protocol only if the record is for the primary domain. For example, _minecraft._tcp like shown in the screenshot below.
Type Choose "SRV-Service".
TTL How long the server should cache the information. 3600.
Priority 0
Weight 5
Port The port your Minecraft server is running on.
Target Your Minecraft server hostname.
Type Choose "SRV-Service".
TTL How long the server should cache the information. 3600.
Priority 0
Weight 5
Port The port your Minecraft server is running on.
Target Your Minecraft server hostname.
STEP 5: Use Dynu DDNS service to access your computer remotely
Download the appropriate client software and run it in the computer to keep the hostname mapped to your dynamic IP. You may also set up the DDNS service in your router if your router supports it.
You should now be able to connect to your Minecraft server using yourhostname.dynu.com:25565 (if port forwarding is set up) or yourhostname.dynu.com (if SRV records have been set up). Of course, don't forget to share the hostname with your friends so that they may also connect to your server!